
How to Take a Screenshot on a Chromebook: In today’s digital age, screenshots have become an indispensable tool for communication, troubleshooting, and documentation. Whether you’re capturing a memorable moment, saving important information, or sharing content with others, knowing how to take a screenshot on your Chromebook is a valuable skill. In this comprehensive guide, we’ll explore various methods and tools available for capturing screenshots on Chrome OS, catering to different preferences and needs.
Also read: How to Take a Screenshot on Android
Understanding Screenshots on Chromebooks
Before diving into the methods, let’s clarify what a screenshot is. A screenshot, also known as a screen capture or screen grab, is essentially a digital image of what’s displayed on your computer screen at a specific moment. It allows you to capture anything from web pages and documents to software interfaces and images, preserving them for future reference or sharing.
Method 1: Using Keyboard Shortcuts
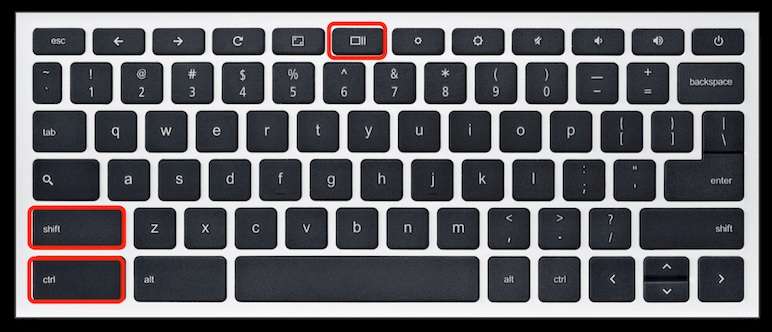
Chromebooks offer several keyboard shortcuts for capturing screenshots quickly and efficiently. These shortcuts are easy to use and can be accessed without the need for additional software or tools. Here are some commonly used keyboard shortcuts for taking screenshots on Chromebooks:
- Capture the Entire Screen: Press the “Ctrl” key and the “Switch Window” key simultaneously. The Switch Window key is typically located in the top row of keys and looks like a rectangle with two vertical lines to the right.
- Capture a Specific Area: Press the “Ctrl,” “Shift,” and “Switch Window” keys simultaneously. Your cursor will change to a crosshair. Click and drag to select the area of the screen you want to capture.
- Capture the Active Window: Press the “Alt” key and the “Switch Window” key simultaneously. This will capture the currently active window and exclude any other elements on the screen.
- Accessing the Screenshots: Once you’ve captured a screenshot, it will be saved to your Chromebook’s Downloads folder by default. You can access the Downloads folder by opening the Files app from the app launcher.
Read also: How to Screenshot on HP Laptop or Desktop Computers
Method 2: Using the Overview Mode
Chromebooks also allow you to capture screenshots using the Overview mode, which displays all open windows and apps on a single screen. Here’s how to use the Overview mode to take screenshots:
- Enter Overview Mode: Press the “Overview” key, which is typically located in the top row of keys and looks like a square with two lines to the right. Alternatively, you can swipe down with three fingers on the trackpad.
- Capture the Screen: Once in Overview mode, click on the window or app you want to capture. Then, press the “Ctrl” and “Switch Window” keys simultaneously to capture the entire screen, or press the “Ctrl,” “Shift,” and “Switch Window” keys simultaneously to capture a specific area.
- Accessing the Screenshots: Like the keyboard shortcut method, screenshots captured using the Overview mode will be saved to your Chromebook’s Downloads folder by default.
Method 3: Using the Power and Volume Down Buttons (Tablet Mode)
If you’re using a Chromebook in tablet mode or have a convertible device with a touchscreen, you can take screenshots using a combination of hardware buttons. Here’s how to do it:
- Prepare the Screen: Navigate to the screen you want to capture. Ensure that everything you wish to include in the screenshot is visible on the display.
- Press the Power and Volume Down Buttons: Press and hold down the Power button and the Volume Down button simultaneously for a brief moment. The screen will flash, indicating that the screenshot has been captured.
- Accessing the Screenshots: After capturing the screenshot, it will be saved to your Chromebook’s Downloads folder, just like screenshots captured using keyboard shortcuts or the Overview mode.
Method 4: Using Chrome Extensions
If you’re looking for more advanced screenshot capturing features or additional functionality, you can install Chrome extensions specifically designed for taking screenshots. These extensions offer a wide range of features, such as annotating screenshots, capturing entire web pages, and automatically saving screenshots to cloud storage. Here are some popular Chrome extensions for taking screenshots:
- Lightshot: Lightshot is a lightweight and easy-to-use screenshot tool that allows you to capture specific areas of the screen, annotate screenshots with text and shapes, and share them instantly. Once installed, you can activate Lightshot by clicking on its icon in the Chrome toolbar or by using the keyboard shortcut (Ctrl + Shift + E).
- Awesome Screenshot: Awesome Screenshot is a feature-rich screenshot tool that offers a variety of capturing options, including capturing entire web pages, selected regions, or visible content. It also provides annotation tools, such as text, arrows, and shapes, allowing you to add notes and highlights to your screenshots. Once installed, you can access Awesome Screenshot by clicking on its icon in the Chrome toolbar.
- Nimbus Screenshot & Screen Video Recorder: Nimbus is a versatile screenshot and screen recording tool that offers both capturing and editing capabilities. In addition to taking screenshots, you can record screencasts, annotate images with text and shapes, and even blur sensitive information. Nimbus integrates seamlessly with Google Drive and other cloud storage services, making it easy to save and share your screenshots.
Conclusion
Capturing screenshots on a Chromebook is a simple yet powerful feature that can be incredibly useful in various situations. Whether you prefer using keyboard shortcuts, the Overview mode, hardware buttons, or Chrome extensions, there’s a method suited to your needs and preferences.
By following the step-by-step instructions outlined in this guide, you can become proficient in capturing and managing screenshots on your Chromebook, empowering you to work more efficiently and effectively in the digital world. So go ahead, capture those important moments, save valuable information, and unleash the full potential of your Chromebook.
FAQ: How to Take a Screenshot on a Chromebook
1. How do I take a screenshot on my Chromebook?
To capture a screenshot on a Chromebook, press the Ctrl + Show windows key (typically located in the top row, resembling a rectangle with two vertical lines to the right) simultaneously. The screenshot will be saved to your Downloads folder.
2. What if my Chromebook does not have a "Show windows" key?
If your Chromebook does not have a dedicated "Show windows" key, you can press the Ctrl + F5 keys together to take a screenshot. On some Chromebooks, you may need to press Ctrl + F5 + Shift to capture a partial screenshot.
3. How can I take a screenshot of only a specific area on my Chromebook?
To capture a specific area of the screen on a Chromebook, press Ctrl + Shift + Show windows (or Ctrl + Shift + F5 on Chromebooks without a "Show windows" key). Click and drag to select the area you want to capture. The screenshot will be saved to your Downloads folder.
4. Can I take screenshots of individual windows or tabs on my Chromebook?
Yes, to capture a screenshot of a specific window or tab, press Alt + Show windows (or Alt + F5 on Chromebooks without a "Show windows" key). Click on the window or tab you want to capture. The screenshot will be saved to your Downloads folder.
5. How do I access and view the screenshots I've taken on my Chromebook?
After taking a screenshot, you can open the Files app on your Chromebook. By default, screenshots are saved in the "Downloads" folder. You can also view and manage screenshots directly from the notification that appears briefly after taking a screenshot.